
English rook hunters using a lantern to illuminate Rooks roosting in the trees that they are shooting with a stone crossbow.
Disclaimer: This blog post is intended for information purposes only and in no way do I encourage you to use the techniques discussed in the blog post.
In most states night hunting is frowned upon so please make sure to check your local laws regarding hunting at night. There are special circumstances in which night hunting is still possible and I will cover these instances in this post.
Remember you alone are responsible for your actions and I'm no legal advisor so I cant possibly know what rules apply to your special corner of the world, as with all things use your own discretion.
Making a low cost head lamp rig for night hunting with a slingshot.
This project was inspired by the creativity of an Electrician that works in the same place as I do. Naturally I immediately saw the potential in the idea for its use in night hunting gear.
Why did I make this night hunting rig when you can just buy a head lamp from any store and it has a red beam if you need right?
Yes you can buy a head lamp but that's not the reason to ignore this project.
The caveat with head lamps and their use for slingshot hunting at night. From my personal experiences using head lamps and the experiences of others, the problem is shooting accurately?
Why does this happen? Simple answer is that the way a head lamp is made, the elastic strap goes over your head and the light beam is fixed in the middle of your forehead just above the in-between of your eyes. What this does is force your head to move in an unnatural fashion in order to have the light in line with your target i.e. the rabbit or roosting pigeon.
Many shooters myself included align our heads with the slingshot fork orientation as it is held in our hands. When you are wearing the standard head lamp, the light's position causes you to turn your head in an awkward position and this affects your accuracy when shooting the slingshot at a specific target after dark.
Head Lamp line of vision is center line and your head and eyes naturally want to follow this light and this is the problem when shooting with the Slingshot.
Whether you shoot with the fork upright or canted you are using either your right or left hand to hold the fork and this will align your feet and head with the orientation of your slingshot fork.
The head lamp forces you to instead align with the light and its illumination of your target. This is when inaccuracies occur.
The solution to our problem
If we look at the old wood cut picture at the beginning of this blog post we see a gentleman holding a lantern illuminating the rooks in the tree whilst the other gent prepares to fire at the rooks with his stone crossbow.
Aha! Then the light must be coming from behind the shooter thus illuminating the target and not forcing the shooter's eyes to follow the light.
I once had the experience with my resortera of having another illuminate a roosting pigeon which I was able to accurately shoot with ease.
I know this seems redundant but it is not: Enter the electrician at work.
Where I work I saw a man an electrician rig up his hard hat with a flash light on the side of his head to help him see the electrical components he regularly fixes at work on the various machines.
I tried this and this is what I came up with and here is the project.
Inexpensive when compared to the inaccurate head lamp and its varying costs from $20 to $50 USD
DIY head lamp project:
Materials:
1. A hard hat (I got mine for free at work) but they can be purchased inexpensively from prices of $5 to $10 USD. Note you can use a baseball cap instead but it will take some stitch work. For now we stick with the hardhat.
1. 9 led small flash light I purchased mine from the 99 cents only store and it worked perfectly for this project.
Some strips of inner tube rubber
1. red sharpie marker
1. Used 20 ounce coca cola bottle ( it should be this kind because the plastic is very clear transparent)
Tools: Scissors and a pocket knife
Now to making the hard hat ready.
Take the knife and you want to slowly make two holes vertically on the side of hat that is the same side as the hand you hold your fork with. (I hold fork in right hand) carefully drill two deliberate holes just above on the hard hat side close to but before your ear area.
The holes should be like this : just two vertical holes
Pull the inner tube rubber strip through these holes and tie this on the inside of the hard hat you want to leave just enough space to be able to stretch the band over your flash light. It should look something like this (my hat)

And here's a frontal view

In theory we are done and this is enough for night hunting rabbits that may be plaguing your garden at night. However with some critters you are hunting at night, the normal led light will spook the critter. This happens a lot with Pigeons roosting in barns or in the underpass of a bridge they know the led light means trouble.
How do we get past this? With a red light that's how we do it, for some reason creatures like Pigeons aren't spooked by the soft light of a red lamp setting.
We are now going to make a red lens for our led lamp set up.
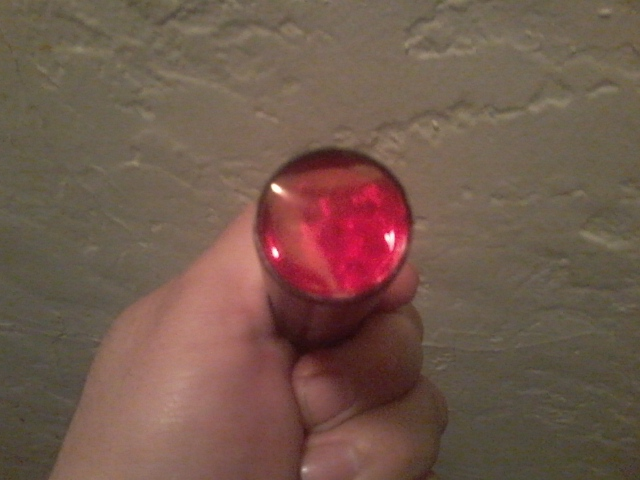
Take your empty 20 ounce coke bottle

Make a cut in the middle coke bottle as you can see this is a flat part of the bottle. Do your best to cut this center ribbon out and when it comes out it will naturally roll on you. Next take your sharpie marker and the led lamp and flatten the plastic strip and gently outline the mouth of the led lamp and cut out a circle.
Next slowly and carefully cut just enough so that this clear circle will fit snugly inside over the lens of the led lamp it should naturally stay inside as there is a lip inside this part of the lamp.
If you were careful with the cutting you will be able to gently pop out this new lens and put it back as needed.
Next take the red sharpie marker and color your plastic make shift lens with the red marker and let it dry and do both sides of this lens.
It should look like this

Like this you simply have to carefully place it inside the head of the led lamp over its first lens. Then this is your red beam lamp ready to go.

There you have a complete red light lamp that will help you in shooting roosting pigeons at night to shooting nervous rats as they also are confused by the red light.
Noted it is not as professional as a high end and high cost red light setting on a head lamp but it will work perfectly for our night hunting uses.
Also the light created from this rig will give your eyes the illusion that someone else is holding the lamp on the target for you and this will allow you to shoot in your natural slingshot position thus improving your accuracy by a great margin.
It cost me at the most $5.00 to create this head lamp rig and it has a red lens that can be removed for the normal setting when going after rabbits.
Give it a try if you have an invasion of pigeons in your barn or if the rabbits are raiding your garden now you have a means to shoot with greater accuracy at night.
To quote a fellow hunter : We operate a low cost operation here.
Good luck hunting